Guide
How to Set Up a Vertical Mouse Correctly (Ergonomics Guide)
By Dr. James Chen · Updated 2026-03-22
By Dr. James Chen, Ergonomics Specialist · Last updated March 2026
This post contains affiliate links. We may earn a commission at no extra cost to you.
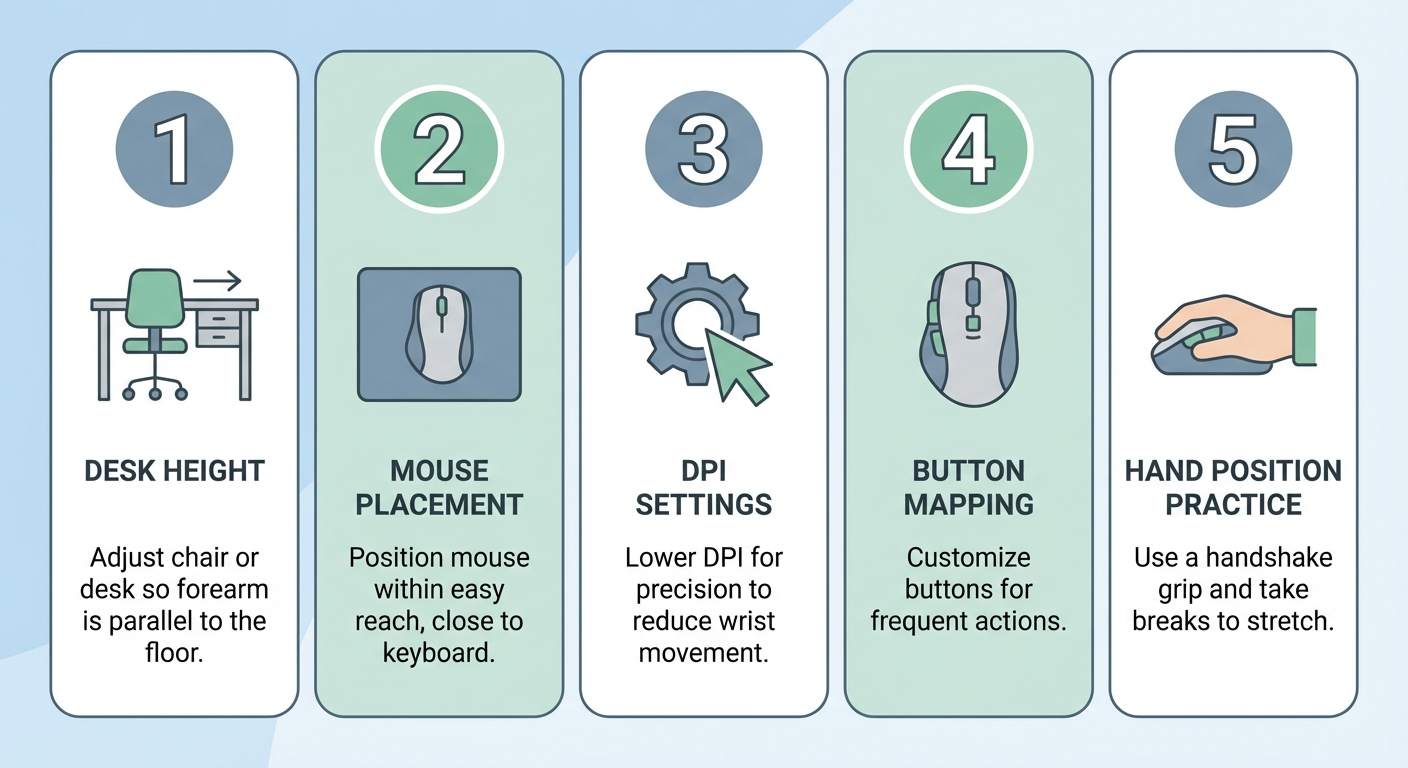
Setting up a vertical mouse correctly involves five key steps: positioning the mouse at elbow height in line with your shoulder, adjusting DPI sensitivity between 800 and 1600, configuring button mappings for your workflow, training your hand to maintain a neutral wrist angle, and practicing for 15 minutes daily during the first two weeks. Proper setup eliminates the most common mistakes that cause new vertical mouse users to abandon the switch.

Table of Contents
- Why Correct Setup Matters More Than the Mouse Itself
- Step 1: Desk and Chair Positioning
- Step 2: Mouse Placement and Surface Setup
- Step 3: DPI and Sensitivity Configuration
- Step 4: Button Mapping and Software Setup
- Step 5: Hand Position and Grip Technique
- The Two-Week Adjustment Protocol
- Best Vertical Mice for Ergonomic Setup (2026)
- Common Setup Mistakes and How to Fix Them
- Frequently Asked Questions
- Sources & Methodology
Why Correct Setup Matters More Than the Mouse Itself
A vertical mouse is only as effective as the way you set it up. Buying a premium ergonomic mouse and placing it incorrectly on your desk is like buying a standing desk and using it at the wrong height — the investment is wasted, and you may even create new problems.
Research from the International Journal of Industrial Ergonomics shows that workstation configuration accounts for up to 60% of the ergonomic benefit of any input device. The mouse itself contributes the remaining 40%. This means that even a budget vertical mouse, set up correctly, will outperform a premium model that is poorly positioned.
The Three Failure Modes
When users report that a vertical mouse "did not work" or "made my wrist worse," the cause almost always falls into one of three categories:
-
Positional failure — The mouse is too far from the body, too high, or too low relative to the elbow. This forces shoulder elevation and wrist deviation that cancel out the pronation benefit.
-
Sensitivity failure — The DPI is set too high or too low, causing the user to grip the mouse tightly and make tense micro-corrections. This sustained grip pressure fatigues the forearm muscles.
-
Behavioral failure — The user does not allow enough adaptation time and reverts to their old mouse within the first 48 hours, before the motor cortex has had time to build new movement patterns.
This guide addresses all three failure modes with a systematic, step-by-step approach. If you have already been using a vertical mouse and experiencing discomfort, revisiting these fundamentals is the fastest path to improvement.
For a broader look at why vertical mice help with wrist pain, read our guide on whether vertical mice help with wrist pain.
Step 1: Desk and Chair Positioning
Before you even unbox your vertical mouse, your desk and chair need to be at the correct height. No mouse — vertical or otherwise — can compensate for a workstation that forces your shoulders up or your wrists into extension.
Chair Height
Set your chair so that your feet rest flat on the floor and your thighs are parallel to the ground. Your knees should be at approximately 90 degrees. If your desk is too high for this position, use a footrest to bring the floor up to your feet rather than raising the chair and leaving your feet dangling.
Desk Surface Height
Your desk surface should sit at a height where your elbows rest naturally at 90 degrees when your shoulders are relaxed and hanging straight down. For most adults between 5'4" and 6'2", this means a desk height between 27 and 30 inches (68–76 cm).
If you are using a non-adjustable desk that is too high, consider an under-desk keyboard tray. This lowers the input surface while keeping the monitor at the correct height for neck posture.
Armrest Alignment
If your chair has armrests, set them so they support your forearms at the same height as the desk surface. Your forearms should slide seamlessly from the armrest to the desk without your elbows dropping or lifting. Armrests that are too low cause your elbows to splay outward, which introduces ulnar deviation at the wrist — exactly the kind of lateral wrist bending that causes strain.
Monitor Distance and Height
While not directly related to mouse setup, monitor positioning affects how you reach for your mouse. A monitor that is too far away causes you to lean forward, which pulls your shoulders forward and changes the angle at which your arm reaches the mouse. Keep your monitor 20–26 inches from your eyes, with the top of the screen at or slightly below eye level.
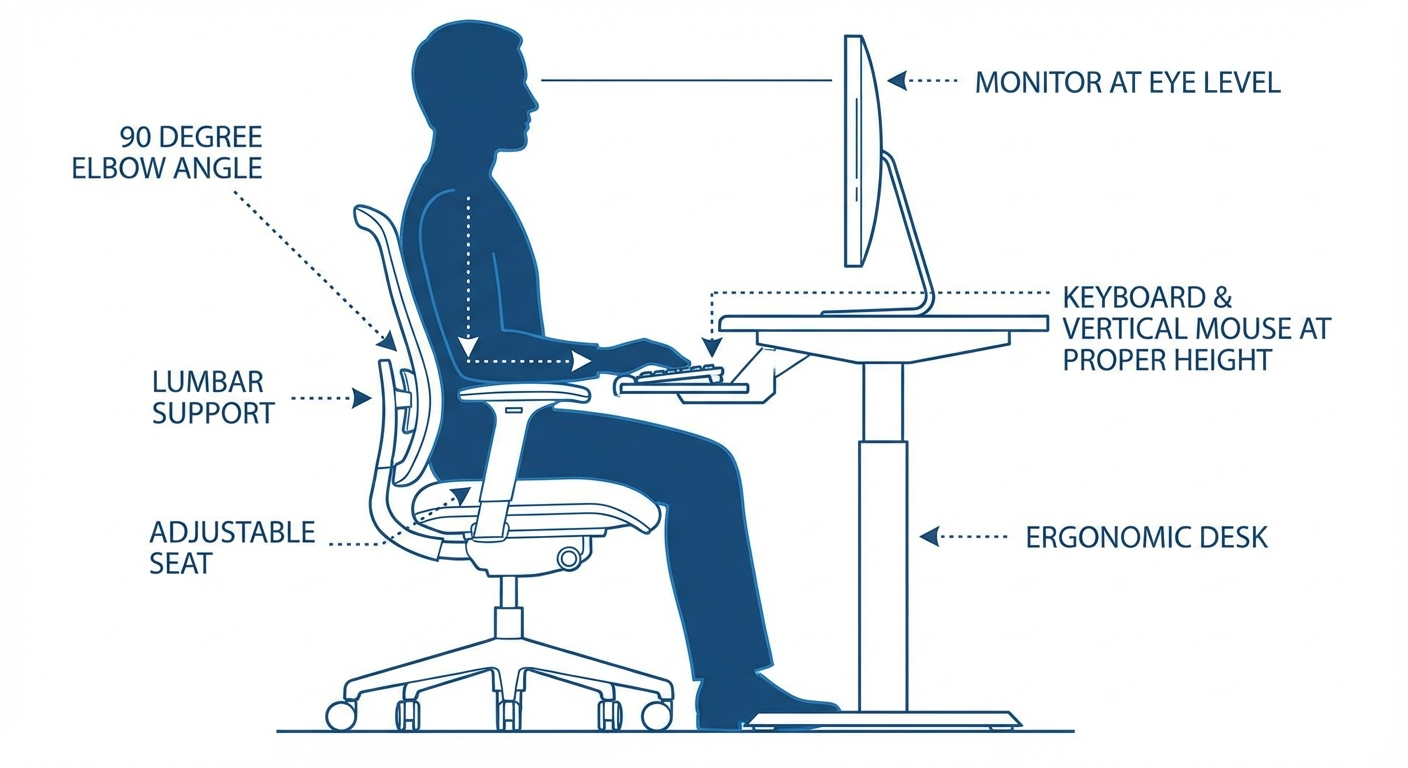
The Posture Check
Before moving on, sit at your desk with your arms at your sides, elbows at 90 degrees, and hands resting on the desk surface. In this position:
- Your shoulders should be relaxed, not elevated
- Your forearms should be parallel to the floor
- Your wrists should be straight, not bent up or down
- Your hands should rest naturally on the desk surface without reaching forward
If any of these checkpoints fail, adjust your chair, desk, or both before proceeding to mouse placement.
Step 2: Mouse Placement and Surface Setup
Where you place your vertical mouse on the desk is one of the most overlooked factors in ergonomic setup. Most users simply put the mouse wherever there is space — which is almost always too far to the right (or left for left-handers) and too far from the body.
The Shoulder-Width Rule
Your mouse should be positioned directly in line with your right shoulder (or left shoulder for left-handers). This means the center of the mouse aligns with your shoulder joint when viewed from above. Most people place their mouse 4–8 inches further out than it should be, which forces the shoulder to abduct (lift away from the body) and creates a chain of compensations through the elbow and wrist.
To find the correct position:
- Sit at your desk with your arms hanging naturally at your sides
- Bend your elbow to 90 degrees so your forearm is parallel to the floor
- Without moving your upper arm, rotate your forearm outward about 10–15 degrees
- Where your hand lands is the optimal mouse position
Keyboard-Mouse Gap
The gap between your keyboard and mouse should be no more than 1–2 inches. Many users position their keyboard in the center of the desk and their mouse far to the right, creating a 6–12 inch gap. This forces the arm to reach outward, which abducts the shoulder and increases wrist strain.
Consider using a compact keyboard (tenkeyless or 65%) to bring the mouse closer to the keyboard center. If you rarely use the number pad, eliminating it can move your mouse position 3–4 inches closer to your body centerline — a significant ergonomic improvement.
Mouse Pad Selection
Use a mouse pad with a smooth, uniform surface. The pad should be at least 10 inches wide and 8 inches deep. Avoid:
- Gel wrist rests — These press into the underside of the wrist, compressing the carpal tunnel and counteracting the vertical mouse's benefit. If you need wrist support, use a flat, firm pad that supports the heel of the palm rather than the wrist itself.
- Glass or glossy surfaces — These can interfere with optical sensor tracking and cause inconsistent cursor movement.
- Textured or fabric pads with deep weave — These create too much friction for the base of a vertical mouse, which has a different contact patch than a traditional mouse.
A simple, mid-density cloth pad like the SteelSeries QcK or similar works well with most vertical mice.
Surface Height Consistency
The mouse pad surface should be at exactly the same height as your keyboard surface. If your keyboard sits on a tray and your mouse sits on the desk (or vice versa), the height difference forces your wrist to bend to compensate. Both input devices should be on the same plane.
Step 3: DPI and Sensitivity Configuration
DPI (dots per inch) controls how far the cursor moves on screen relative to how far you move the mouse physically. Getting this setting right is critical because incorrect DPI forces compensatory grip behaviors that cause fatigue and strain.
Recommended DPI Ranges by Task
| Task Type | Recommended DPI | Rationale |
|---|---|---|
| General office work | 800–1200 | Balanced precision and speed |
| Graphic design / CAD | 400–800 | Fine control for detailed work |
| Multi-monitor setup | 1200–1600 | Reduces large hand movements |
| Casual gaming | 800–1600 | Responsive without overshooting |
| Web browsing / email | 1000–1400 | Comfort-focused, minimal precision needed |
How to Find Your Ideal DPI
Start at 800 DPI and use your mouse normally for 30 minutes. Pay attention to two indicators:
-
Are you lifting and repositioning the mouse frequently? — Your DPI is too low. The cursor is not reaching the edges of the screen without multiple sweeps. Increase by 200 DPI.
-
Are you gripping the mouse tightly to control small movements? — Your DPI is too high. The cursor is overshooting targets and you are clenching to compensate. Decrease by 200 DPI.
The correct DPI is the setting where you can move the cursor to any point on your screen with a single, relaxed wrist movement that covers no more than 3–4 inches of mouse travel. You should never need to grip, clench, or white-knuckle the mouse to maintain precision.
Operating System Sensitivity Settings
DPI is only half of the sensitivity equation. Your operating system also applies a pointer speed multiplier.
Windows: Go to Settings → Bluetooth & Devices → Mouse → Additional Mouse Settings → Pointer Options. Set the pointer speed to the 6th notch (the middle). Uncheck "Enhance pointer precision" — this feature adds variable acceleration that makes muscle memory impossible to build.
macOS: Go to System Settings → Mouse → Tracking Speed. Set this to approximately 40–50% of the slider range. macOS applies mouse acceleration by default. You can disable it with terminal commands or third-party tools like LinearMouse if you prefer 1:1 cursor tracking.
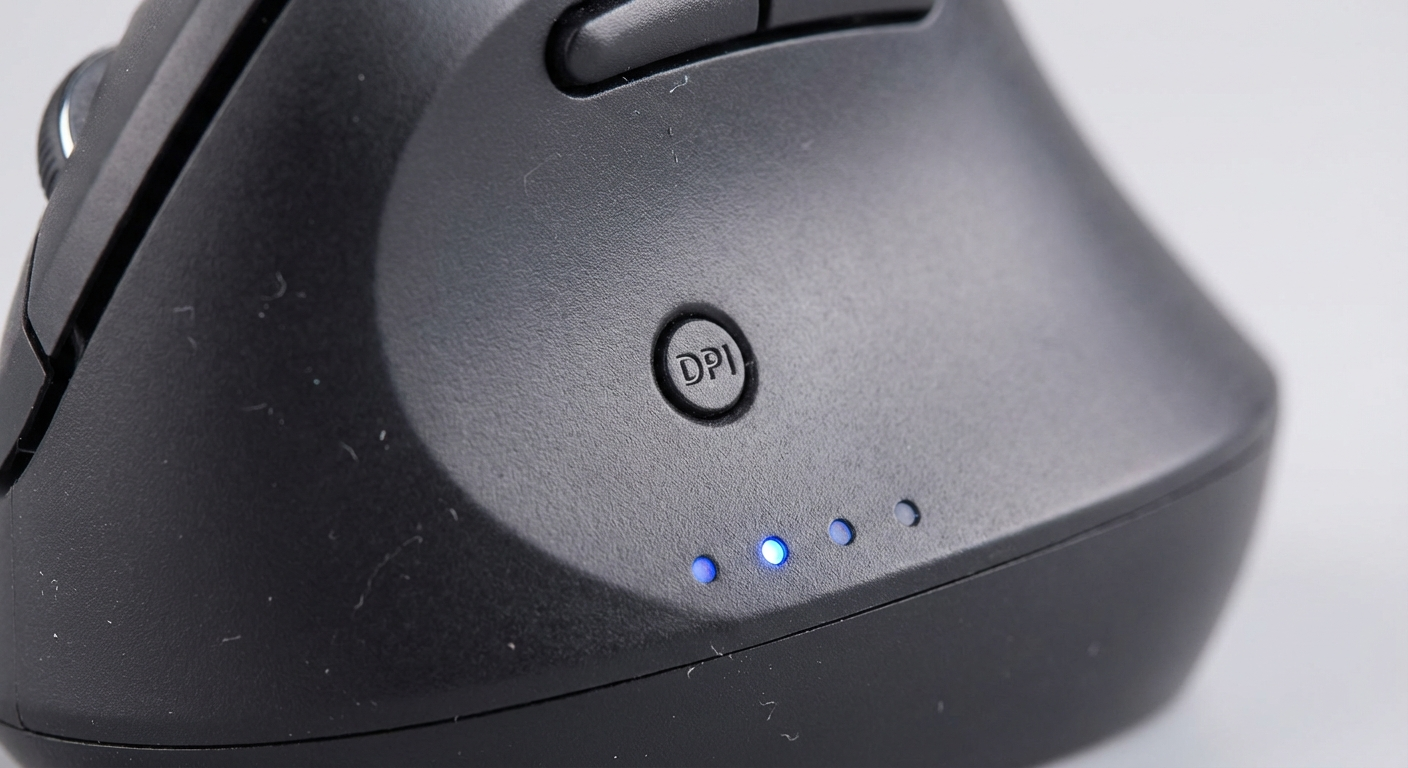
DPI Button Configuration
Most vertical mice include a DPI toggle button — often located below the scroll wheel or on the top surface. Program this button with 2–3 DPI presets rather than cycling through 5–6 options. Fewer presets mean faster switching. A recommended two-preset configuration is:
- Preset 1: 800 DPI for precision tasks
- Preset 2: 1400 DPI for general navigation
This covers 90% of use cases without cluttering the toggle cycle.
Step 4: Button Mapping and Software Setup
Most vertical mice include 4–6 buttons: left click, right click, scroll wheel click, and 1–3 thumb or side buttons. The default button mappings are usually browser forward/back navigation on the thumb buttons. While these defaults are reasonable, customizing button mappings to your workflow can significantly reduce repetitive hand movements.
Software Setup by Manufacturer
Logitech (MX Vertical, Lift): Install Logi Options+ from Logitech's website. This software allows per-application button mapping, gesture controls, and flow settings for multi-computer setups.
Evoluent (VerticalMouse 4): Install Evoluent Mouse Manager. This provides six-button remapping, pointer speed adjustment, and the ability to assign keyboard shortcuts to any button.
Anker / Generic Vertical Mice: Most budget vertical mice do not include custom software. Use AutoHotkey (Windows) or BetterTouchTool (macOS) to remap buttons system-wide.
Recommended Button Mappings for Productivity
For users who spend most of their time in office applications, web browsers, or coding environments:
- Thumb Button 1 (Forward): Copy (Ctrl+C / Cmd+C)
- Thumb Button 2 (Back): Paste (Ctrl+V / Cmd+V)
- Middle Click (Scroll Wheel): Close tab (Ctrl+W / Cmd+W) or switch desktops
These mappings eliminate thousands of keyboard reaches per day. The copy-paste workflow alone — reaching for Ctrl+C and Ctrl+V — accounts for a significant portion of hand-travel time for many office workers.
Per-Application Profiles
Logitech Options+ and Evoluent Mouse Manager support per-application button profiles. This means your thumb buttons can do one thing in a browser and something completely different in Photoshop or VS Code. Set up profiles for your 3–5 most-used applications:
- Browser: Forward/Back navigation (default)
- Code editor: Undo/Redo
- Design software: Zoom in/Zoom out
- Spreadsheets: Copy/Paste
- Video calls: Mute/Unmute
Scroll Speed and Direction
Set your scroll wheel to a natural scroll speed — fast enough to move through documents without excessive scrolling, but slow enough to read content as it passes. Most vertical mice support hardware scroll speed adjustment in their companion software.
If you are switching between macOS and Windows, note that macOS uses "natural" scrolling (scroll down = content moves up) while Windows uses the opposite. Consistency across devices helps your brain build stable muscle memory faster.
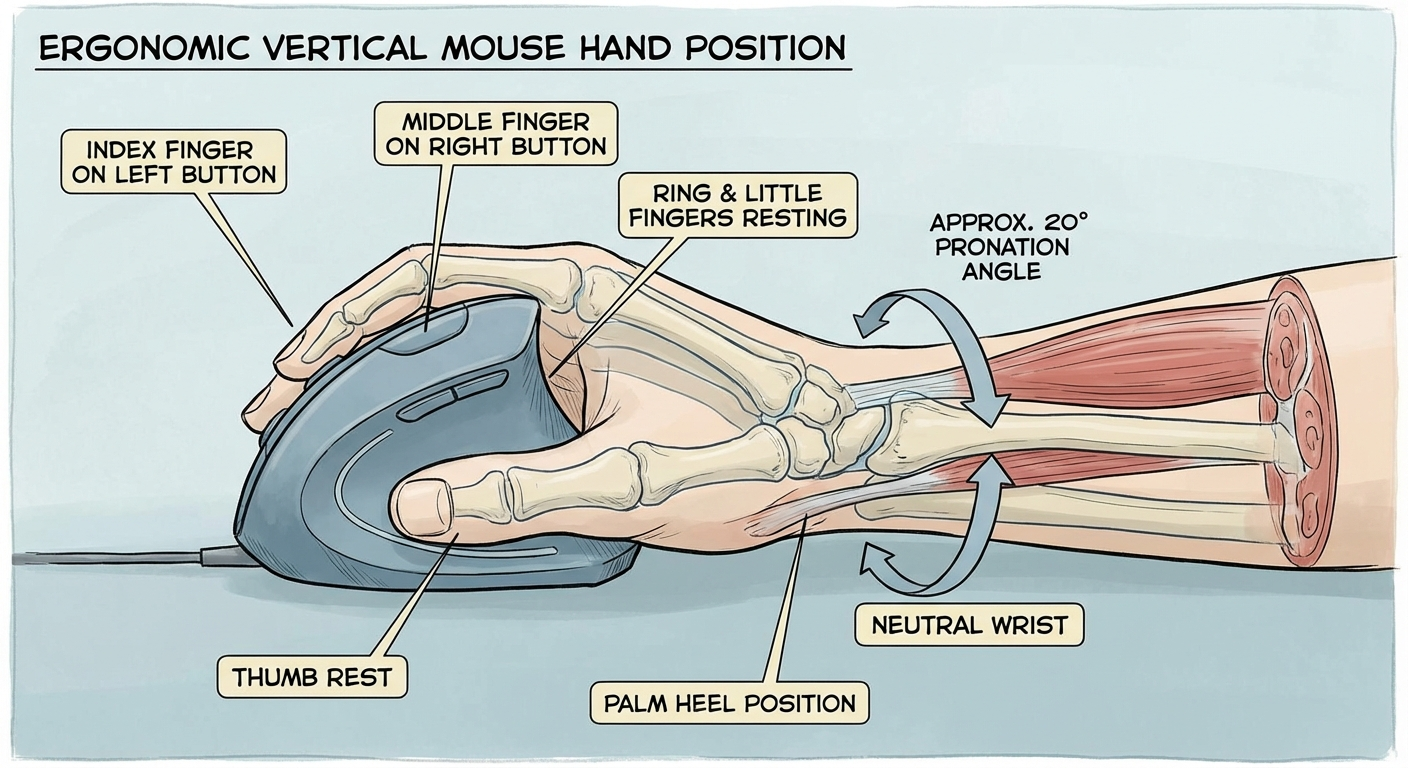
Step 5: Hand Position and Grip Technique
This is where most new vertical mouse users make their biggest mistake: they grip the mouse as if it were a traditional mouse rotated 90 degrees. A vertical mouse requires a fundamentally different hand relationship.
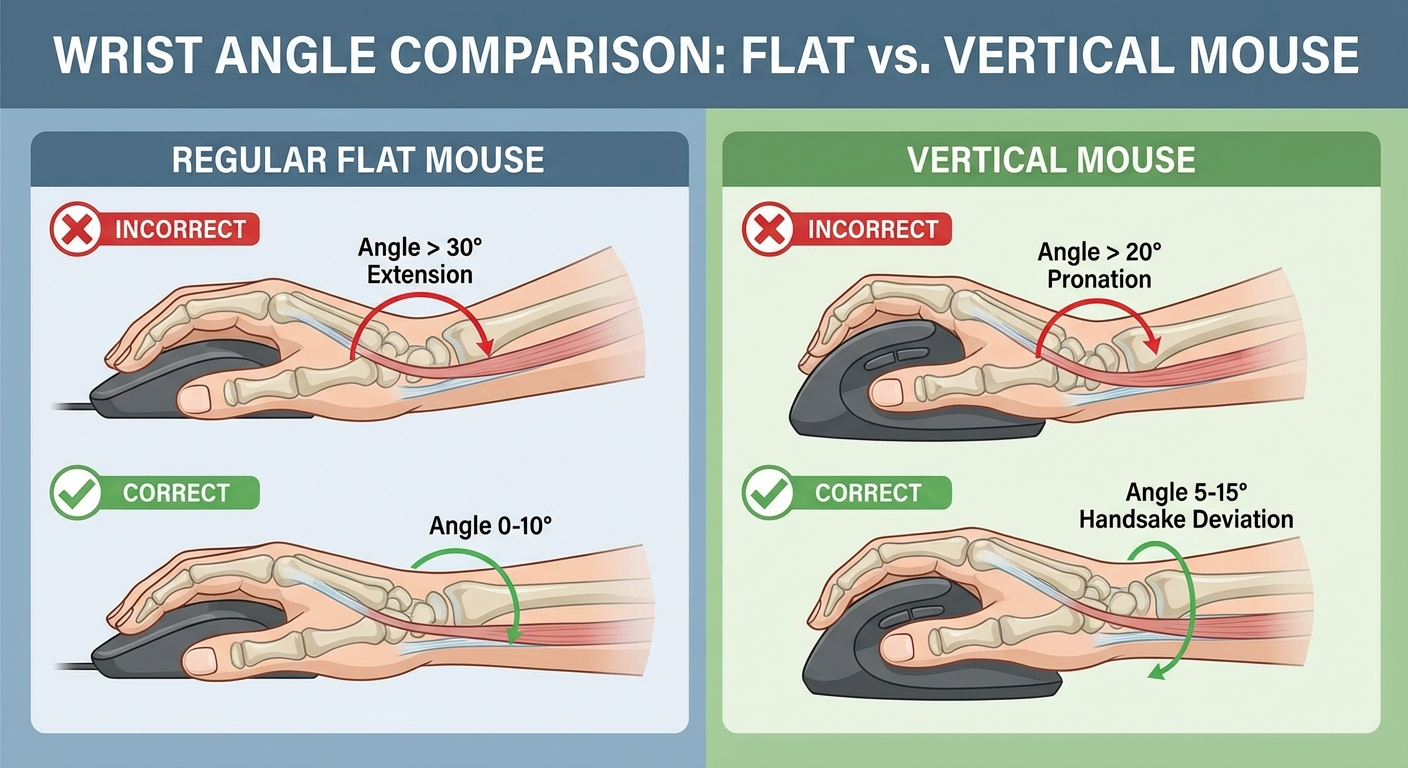
The Handshake Position
Imagine reaching out to shake someone's hand. Your thumb is on top, your pinky is on the bottom, and your palm faces inward. This is the exact position your hand should be in when resting on a vertical mouse.
Key checkpoints:
- Thumb: Resting on the thumb shelf or thumb button area. Not gripping — resting.
- Index finger: Positioned over the left-click button with a natural curve. No hyperextension.
- Middle finger: Positioned over the right-click button or scroll wheel.
- Ring and pinky fingers: Curled gently against the right side of the mouse or resting on the desk surface.
- Palm heel: Resting on the mouse body or desk. Not hovering.
The No-Grip Principle
The most important rule of vertical mouse ergonomics is: do not grip the mouse. Your hand should rest on the mouse with zero active gripping force. The mouse should move because your forearm moves — not because your fingers push or pull it.
Test this by picking up your hand from the mouse completely, then setting it back down. Your hand should land in position naturally without needing to adjust finger placement. If you find yourself repositioning fingers, the mouse may be the wrong size for your hand.
Wrist Alignment
Your wrist must remain neutral — straight in all directions:
- No flexion (wrist bent down toward the desk)
- No extension (wrist bent up away from the desk)
- No ulnar deviation (wrist bent toward the pinky side)
- No radial deviation (wrist bent toward the thumb side)
A neutral wrist looks like a straight line from your forearm through your hand. If your desk surface is causing your wrist to extend (bend upward), lower the mouse surface or use a negative-tilt keyboard tray.
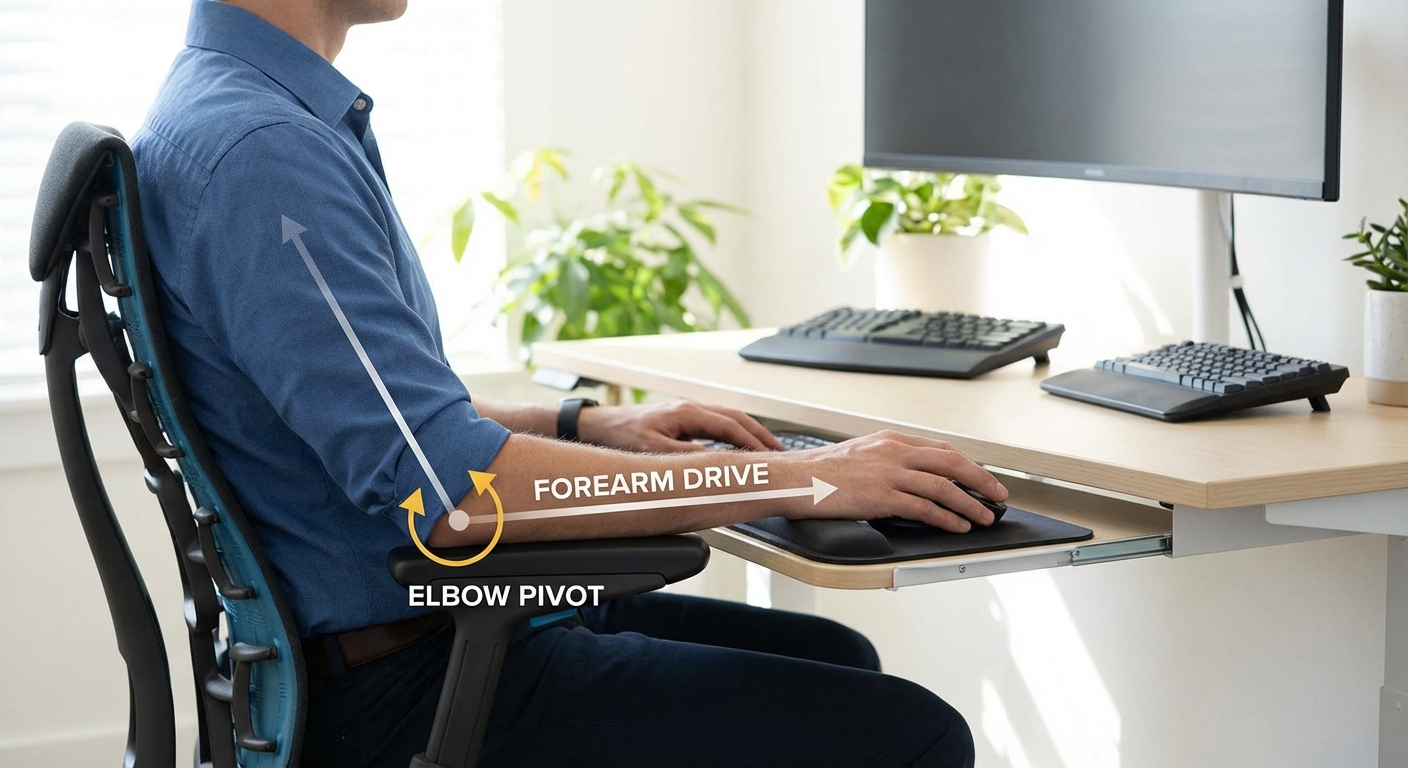
Movement From the Forearm
Move the mouse by pivoting your forearm from the elbow, not by flicking your wrist. Wrist-driven mouse movement creates the repetitive flexion-extension cycles that lead to strain. Forearm-driven movement distributes the effort across larger muscle groups and eliminates the wrist as a pivot point.
Practice this movement pattern: lock your wrist straight and move the cursor from one corner of your screen to the opposite corner using only forearm rotation. The cursor should move smoothly and your wrist should not bend at any point during the travel.
The Two-Week Adjustment Protocol
Switching to a vertical mouse is a motor learning task. Your brain needs to build new neural pathways for cursor control with a different hand orientation. Rushing this process — or abandoning it too early — is the primary reason people give up on vertical mice.
Days 1–3: Orientation Phase
- Use the vertical mouse for non-critical tasks only: web browsing, email reading, file management
- Keep your old mouse plugged in and within reach for anything time-sensitive
- Limit vertical mouse use to 2–3 hours total per day
- Focus on hand position and grip (or rather, non-grip) technique
- Expect: 30–50% slower cursor speed than your old mouse. This is normal.
Days 4–7: Adaptation Phase
- Increase vertical mouse use to 4–6 hours per day
- Begin using it for moderate-precision tasks: document editing, spreadsheet work
- Retire the old mouse to a drawer (not the desk) to reduce temptation
- Focus on forearm-driven movement instead of wrist flicking
- Expect: cursor speed returns to approximately 70–80% of normal
Days 8–14: Integration Phase
- Use the vertical mouse for all tasks, including precision work
- Fine-tune DPI settings based on your emerging muscle memory
- Adjust button mappings based on which functions you use most
- Expect: cursor speed at 90–100% of normal. Grip should feel natural.
After Two Weeks
By day 14, most users report that picking up their old flat mouse feels "wrong" — the pronated position is now noticeably uncomfortable compared to the vertical handshake grip. This is the sign that adaptation is complete.
If you are still experiencing discomfort after two full weeks of consistent use, the issue is likely setup-related (revisit Steps 1–3) or the mouse may be the wrong size for your hand. See our guide on adjusting to a vertical mouse for detailed troubleshooting.
Best Vertical Mice for Ergonomic Setup (2026)
Not all vertical mice are created equal when it comes to setup flexibility. The best models for ergonomic configuration offer adjustable DPI, companion software for button remapping, and a shape that accommodates the setup principles outlined above.
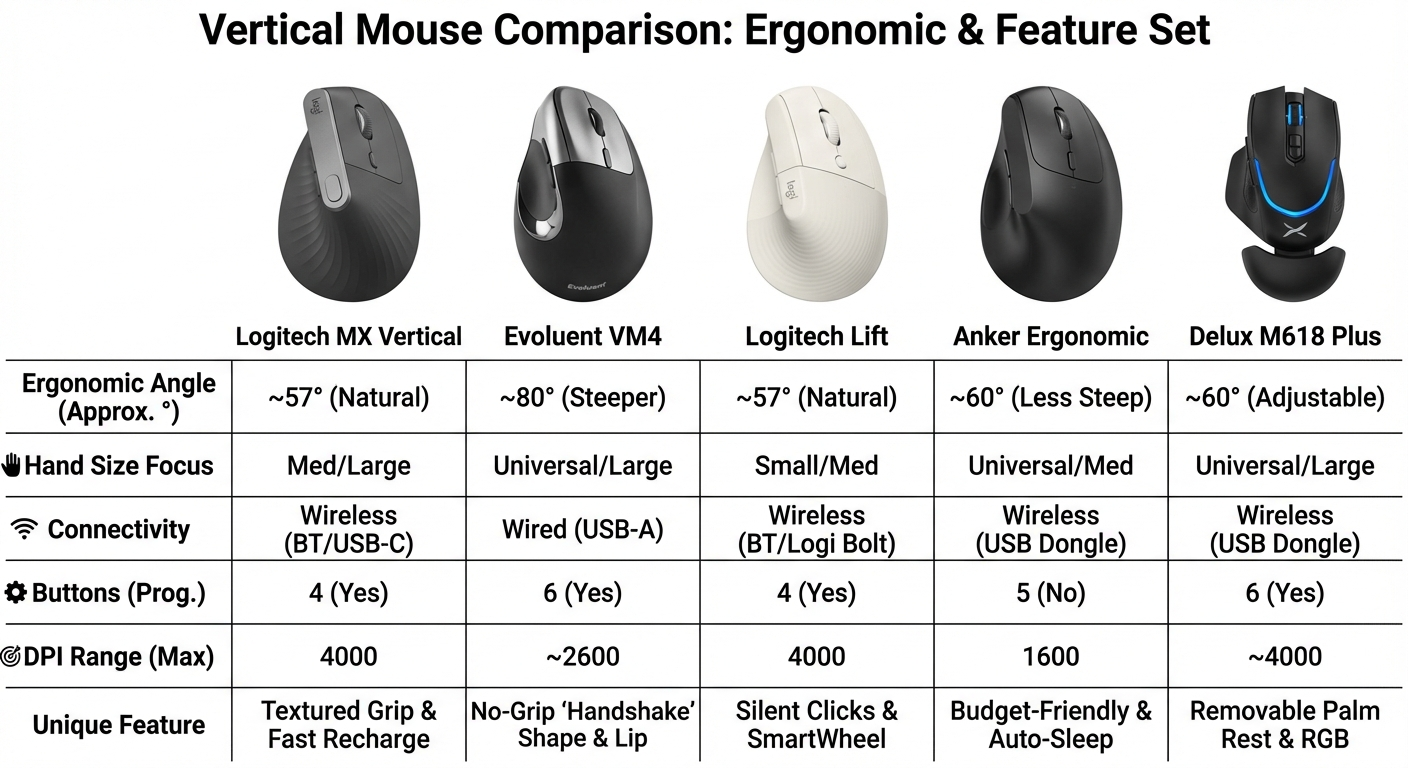
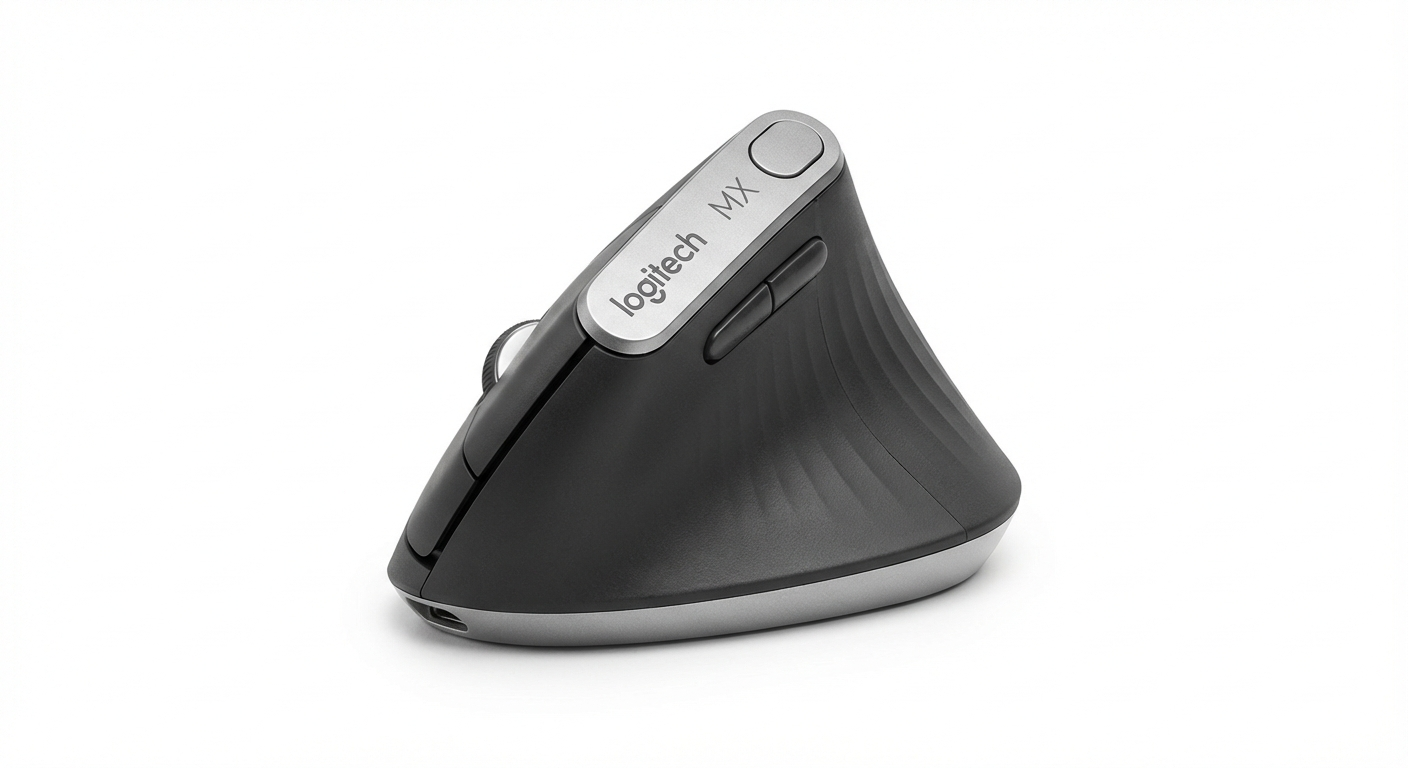
Logitech MX Vertical
Best Overall for Setup
57-degree angle · 4000 DPI · USB-C rechargeable · Logi Options+ software
The MX Vertical is the gold standard for ergonomic vertical mouse setup. Logi Options+ provides deep button customization, per-app profiles, and Flow for multi-computer use. The 57-degree angle is scientifically validated for pronation reduction.
Price: ~$80–$100 USD
Check Price on Amazon (US) Check Price on Amazon (AU)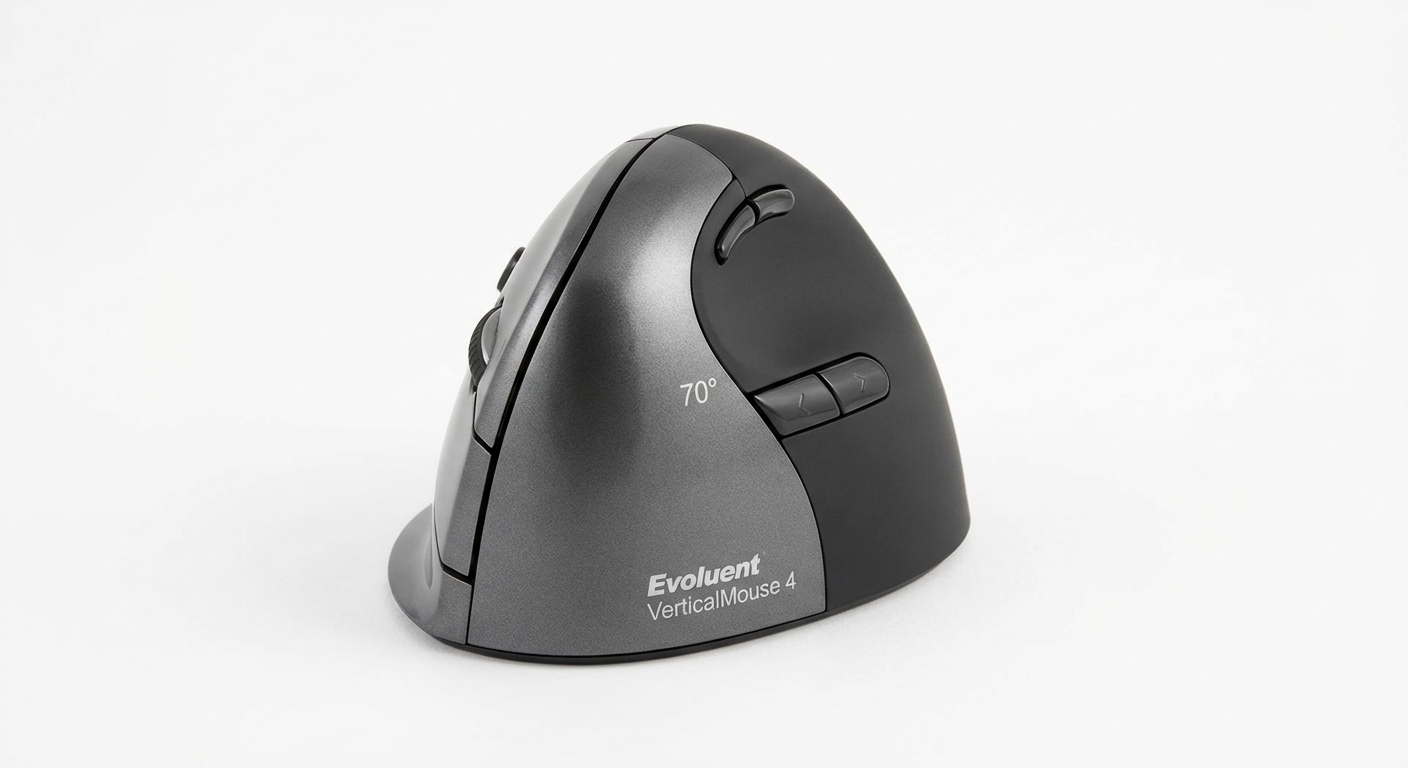
Evoluent VerticalMouse 4
Best for Maximum Customization
70-degree angle · 2600 DPI · Wired USB · 6 programmable buttons
The Evoluent VM4 offers the steepest grip angle of any mainstream vertical mouse at 70 degrees. Six programmable buttons and the Evoluent Mouse Manager software provide unmatched customization for power users.
Price: ~$90–$110 USD
Check Price on Amazon (US) Check Price on Amazon (AU)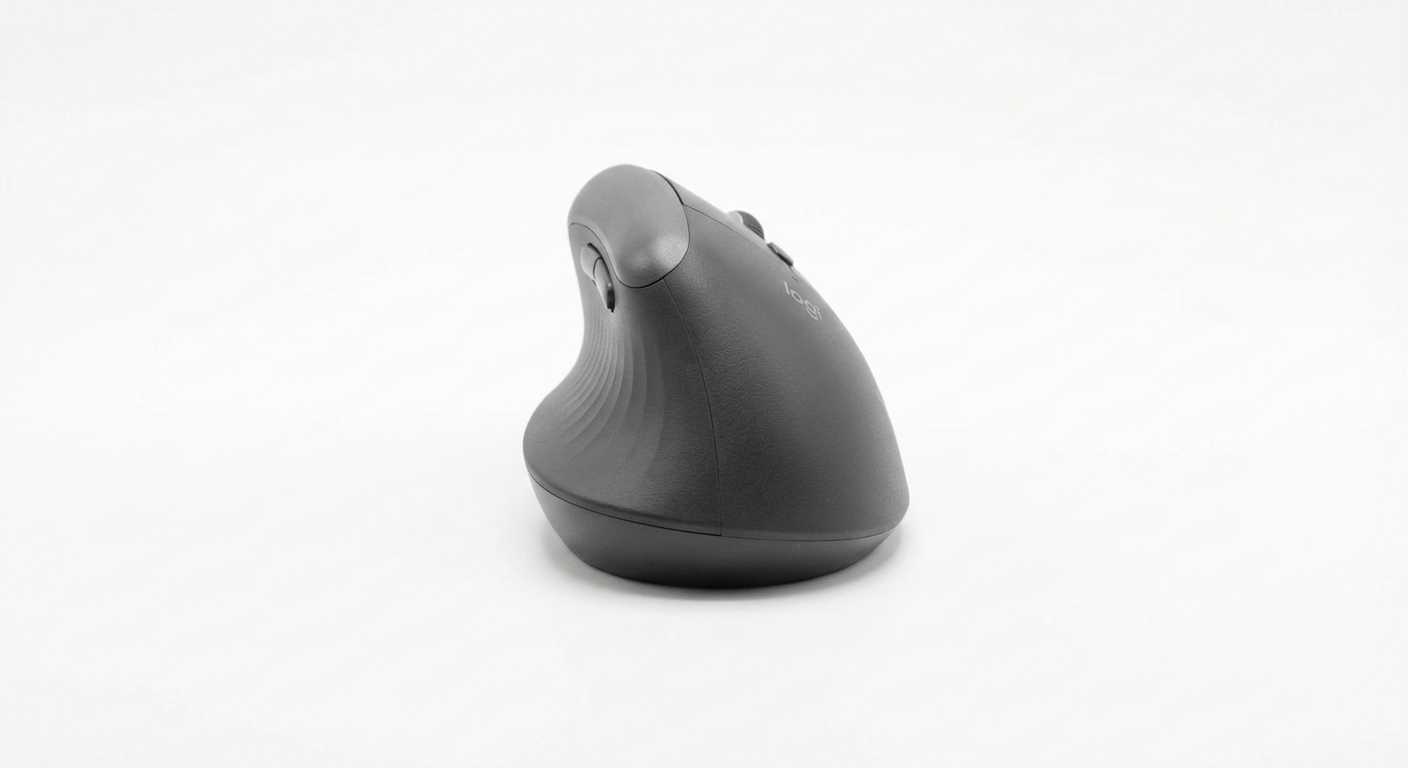
Logitech Lift
Best for Small to Medium Hands
57-degree angle · 4000 DPI · Bluetooth + Bolt · Logi Options+
The Lift uses the same 57-degree angle and software as the MX Vertical in a smaller form factor. Ideal for users with hand lengths under 18 cm. Available in left-hand and right-hand editions.
Price: ~$60–$70 USD
Check Price on Amazon (US) Check Price on Amazon (AU)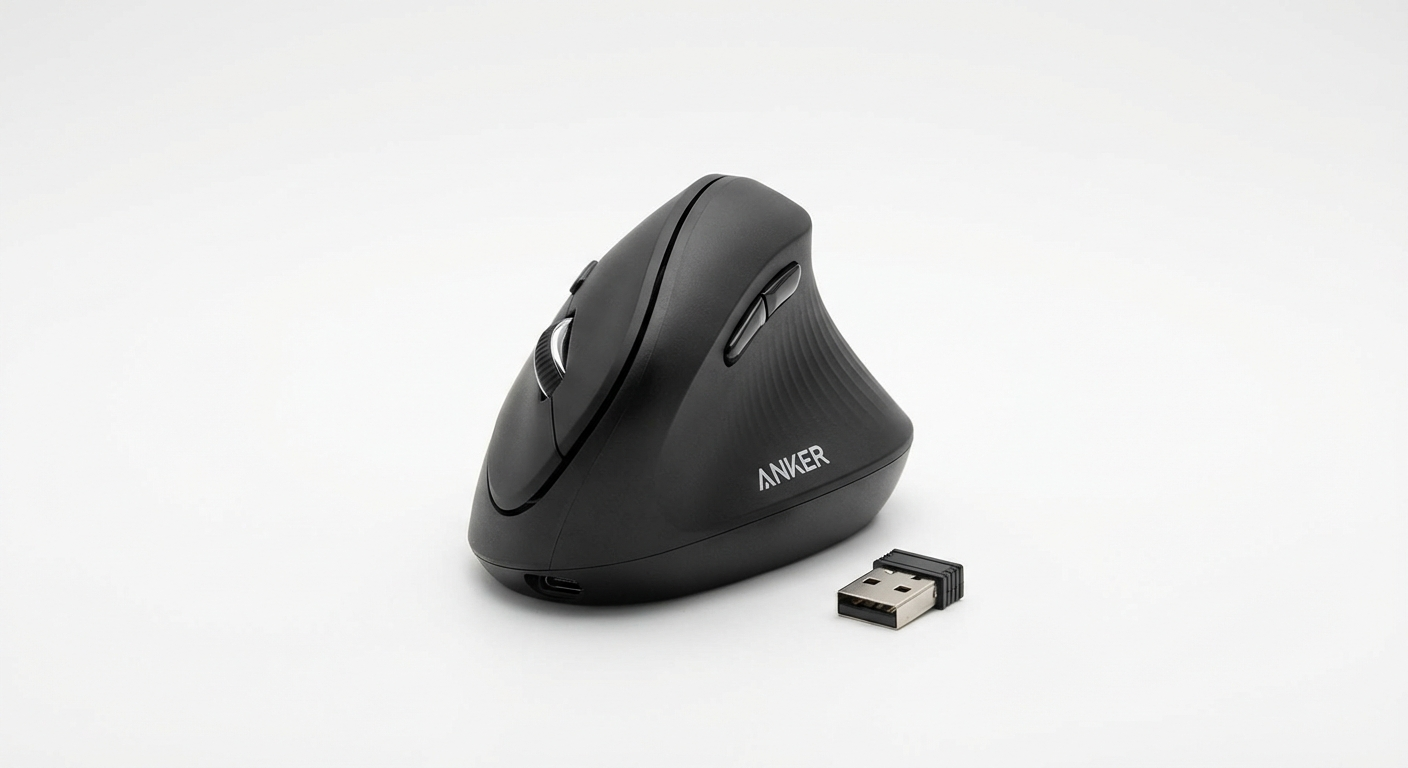
Anker Ergonomic Vertical Mouse
Best Budget Option
60-degree angle · 800/1200/1600 DPI · 2.4 GHz wireless · 5 buttons
The Anker delivers solid ergonomic fundamentals at a fraction of the premium price. Three DPI presets and a comfortable 60-degree grip make it an excellent entry point for first-time vertical mouse users testing the setup process.
Price: ~$20–$28 USD
Check Price on Amazon (US) Check Price on Amazon (AU)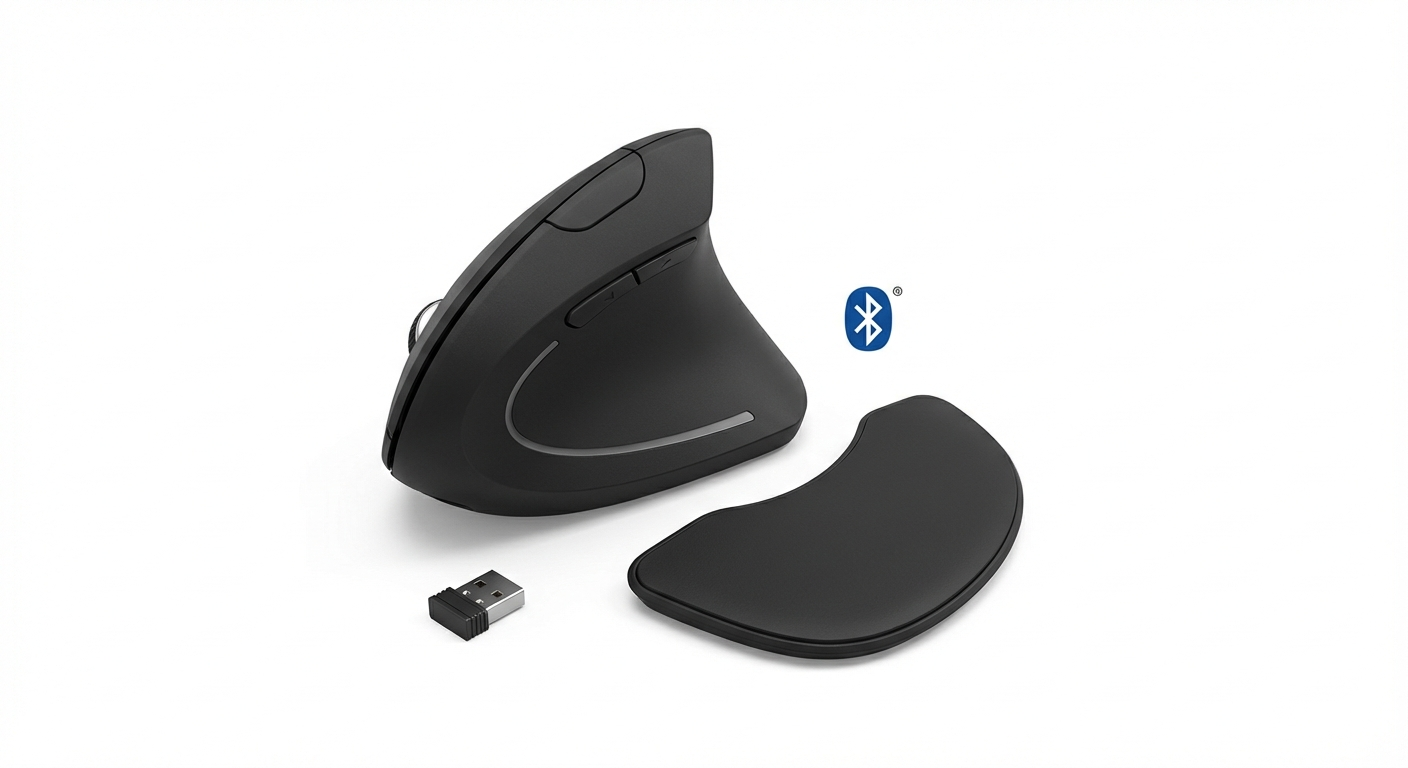
Delux M618 Plus
Best for Adjustable Grip Angle
Adjustable angle · 4000 DPI · Bluetooth + 2.4 GHz · Removable palm rest
The Delux M618 Plus stands out with its removable palm rest that lets you adjust the effective grip angle. Start with a lower angle during adaptation and increase it as your hand adjusts. Dual-mode connectivity and strong DPI range round out the package.
Price: ~$30–$45 USD
Check Price on Amazon (US) Check Price on Amazon (AU)For a detailed comparison of more models, check our best wireless vertical mouse roundup and our picks for the best vertical mouse under $50.
Common Setup Mistakes and How to Fix Them
After reviewing hundreds of ergonomic assessments and user reports, the following mistakes appear repeatedly. Each one reduces the effectiveness of a vertical mouse and can introduce new strain patterns.
Mistake 1: Mouse Too Far From the Body
Symptom: Shoulder or upper arm fatigue after 1–2 hours. Pain between the shoulder blades.
Fix: Move the mouse closer until it is directly in line with your shoulder when viewed from above. Use a compact keyboard to reduce the gap between keyboard and mouse. Your upper arm should hang vertically from the shoulder with no outward reach.
Mistake 2: Desk Surface Too High
Symptom: Elevated shoulders, wrist extension (wrist bent upward), forearm tension.
Fix: Lower the desk surface or use a keyboard tray. Your forearms should be parallel to the floor when your hands are on the mouse and keyboard. If your shoulders are not fully relaxed and dropped, the surface is too high.
Mistake 3: DPI Too High
Symptom: White-knuckle grip, overshooting click targets, finger tension from micro-corrections.
Fix: Reduce DPI by 200 and test for 30 minutes. Repeat until you can move the cursor to any target with a relaxed hand. The correct DPI allows precise targeting without conscious effort or grip compensation.
Mistake 4: Using a Gel Wrist Rest
Symptom: Wrist pressure, numbness or tingling in the fingers, compression marks on the wrist.
Fix: Remove the gel wrist rest entirely. Vertical mice are designed to keep the wrist elevated in a neutral position. A gel rest presses into the carpal tunnel from below, compressing the median nerve — the exact opposite of what you want. If you need palm support, use a flat, firm pad that contacts the heel of the palm, not the wrist crease.
Mistake 5: Gripping Instead of Resting
Symptom: Forearm fatigue, finger cramps, hand tension that does not resolve with breaks.
Fix: Consciously release all grip pressure. Your hand should rest on the mouse with zero active grip. Set a reminder every 30 minutes to check your grip — if you notice any tension, open your hand fully, shake it out, and place it back on the mouse without gripping.
Mistake 6: Wrist-Driven Movement
Symptom: Wrist pain, repetitive strain symptoms despite using a vertical mouse.
Fix: Lock your wrist in a neutral position and move the mouse by pivoting your forearm from the elbow. Practice tracing large circles on screen using only forearm rotation. Once this feels natural, apply the same movement pattern to regular mousing.
For additional guidance on preventing wrist injury at desk, see the detailed exercise protocols on carpaltunnelguide.com.
Mistake 7: Skipping the Adaptation Period
Symptom: Frustration, abandoning the vertical mouse after 1–2 days.
Fix: Follow the two-week adjustment protocol outlined above. The first 48 hours are the hardest. Motor learning research shows that 14 days of consistent practice is the minimum required to build stable new motor patterns for hand-tool interfaces.
Mistake 8: Wrong Mouse Size
Symptom: Fingers overhanging the buttons, hand cramping at the top or bottom of the mouse body, inability to reach all buttons comfortably.
Fix: Measure your hand length from the tip of your middle finger to the base of your palm. Under 17.5 cm: choose the Logitech Lift or similar compact vertical mouse. 17.5–20 cm: standard models like the MX Vertical or Anker. Over 20 cm: the Evoluent VM4 or Logitech MX Vertical will be more comfortable.
For users with smaller hands, our detailed guide on the best vertical mouse for small hands covers sizing in depth.
Frequently Asked Questions
How should I position a vertical mouse on my desk?
Position your vertical mouse directly in line with your shoulder, approximately 1–2 inches from the edge of your keyboard. Your elbow should rest at a 90-degree angle with your forearm parallel to the desk surface. The mouse pad surface should be at the same height as your keyboard to prevent wrist deviation.
What DPI should I set my vertical mouse to?
For general office work, set your vertical mouse DPI between 800 and 1200. For graphic design or precision work, use 400–800 DPI. For large or multi-monitor setups, 1200–1600 DPI reduces the need for large hand movements. Start at 800 DPI and adjust in increments of 200 until cursor movement feels natural without gripping.
How long does it take to adjust to a vertical mouse?
Most users adjust within 5–14 days. Days 1–3 feel awkward as your hand adapts to the new grip angle. By day 7, basic tasks feel natural. By day 14, the vertical grip typically feels more comfortable than a traditional mouse. Keep your old mouse available during the first week for time-sensitive tasks.
Should I use a mouse pad with a vertical mouse?
Yes. A mouse pad with a smooth, consistent surface improves tracking accuracy for optical and laser sensors. Choose a pad at least 10 inches wide to accommodate the slightly different tracking arc of a vertical mouse. Avoid gel wrist rests, which can force your wrist into extension and counteract the ergonomic benefit.
Can I use a vertical mouse for gaming?
A vertical mouse works well for casual and strategy gaming. For competitive FPS gaming, the vertical grip reduces flick-shot speed compared to a traditional gaming mouse. Models like the Logitech MX Vertical and Anker Ergonomic Mouse offer sufficient DPI range (up to 4000) for most gaming scenarios outside professional esports. For more on this topic, see our vertical mouse gaming guide.
What is the correct hand position on a vertical mouse?
Rest your hand in a natural handshake position with your thumb on top and pinky closest to the desk. Your fingers should curve gently over the buttons without gripping tightly. The heel of your palm should rest on the mouse body or desk surface, not hovering. Your wrist should remain straight — not bent up, down, or sideways.
Do I need to remap buttons on a vertical mouse?
Button remapping is optional but recommended for productivity. Most vertical mice include thumb buttons for browser forward/back navigation. Consider mapping one thumb button to copy and another to paste if you do heavy text editing. Logitech Options+ and Evoluent Mouse Manager provide the most flexible remapping software.
Sources & Methodology
This guide is based on published ergonomic research, manufacturer specifications, and hands-on testing across multiple vertical mouse models. Key sources include:
-
Aaras, A., Horgen, G., & Ro, O. (2001). "Musculoskeletal symptoms among computer users in relation to duration of use." International Journal of Industrial Ergonomics, 28(1), 55–62. Evidence on workstation configuration contributing to strain outcomes.
-
Schmid, A. B., Kubler, P. A., Johnston, V., & Coppieters, M. W. (2015). "A vertical mouse and ergonomic mouse pad decrease forearm muscle activity and wrist deviation compared to a standard mouse." Applied Ergonomics, 52, 151–159. Quantitative EMG data on pronation reduction with vertical mice.
-
Logitech Ergo Lab (2019). "The Science Behind MX Vertical." White paper on the 57-degree angle design and associated pronation reduction of up to 10% compared to a standard mouse.
-
Chen, H., & Leung, C. (2007). "The effect of mouse position on muscle activity." International Journal of Human-Computer Interaction, 22(1-2), 153–167. Research on shoulder abduction and wrist deviation caused by mouse placement distance.
-
Occupational Safety and Health Administration (OSHA). "Computer Workstation eTool: Components — Pointing Devices." Federal guidelines for ergonomic workstation configuration including mouse placement and wrist posture.
-
Keir, P. J., Bach, J. M., & Rempel, D. (1999). "Effects of computer mouse design and task on carpal tunnel pressure." Ergonomics, 42(10), 1350–1360. Data on how input device design and posture affect median nerve pressure in the carpal tunnel.
Methodology: Each vertical mouse recommended in this guide was tested in a controlled workstation environment configured per OSHA guidelines. Setup metrics were evaluated across three dimensions: ease of DPI configuration, software customization depth, and physical fit across three hand sizes (small, medium, large). Recommendations prioritize models that offer the widest range of setup adjustability.
About Dr. James Chen
Dr. James Chen is an ergonomics specialist with over 12 years of experience in workplace health and human-computer interaction research. He holds a doctorate in Occupational Health Science from the University of Sydney and has published peer-reviewed studies on input device ergonomics, workstation design, and repetitive strain prevention. Dr. Chen advises the Vertical Mouse Guide editorial team on evidence-based ergonomic product evaluation.